Let’s talk about how to train your dog to walk on a leash. Last week we worked on the wall game, and the main purpose of that game was to bring an immense amount of value to your dog for being behind the front of your body, on the left-hand side, and with the leash slack. You should continue to practice the concepts learned in that drill and apply them to this week’s lesson.
Today, you are going to be introduced to how to lead your dog through moving together, turning right, turning left, and stopping and having your dog sit beside you.
Let me lay some ground rules.
Walk On A Leash – Rule #1
Reward my dog when they are behind the front of my body, on the left-hand side, and with the leash slack.
This is the target of the entire drill. Each time your dog is moving together with you, there should be a reward so that they will remember this lesson. My suggestion is to praise your dog when the leash is slack and sit your dog often and use your food rewards.
Walk On A Leash – Rule #2
Don’t stop moving.
Repeat this to yourself and learn it. It is beneficial. The entire rule is this. I don’t stop moving unless I’m going to sit my dog. You do this because your natural body language plus the guiding pressure of your training collar and leash will help your dog understand that they are to move with you.
Walk On A Leash – Rule #3
Turn around when my dog gets ahead of me.
Repeat this to yourself and learn it. It is also instrumental. Your dog may already be accustomed to pulling you. If you turn away from your dog every time that they pull ahead of you, you will frustrate them from getting ahead and will ultimately see this behavior go away. This will take you some time. Keep practicing.
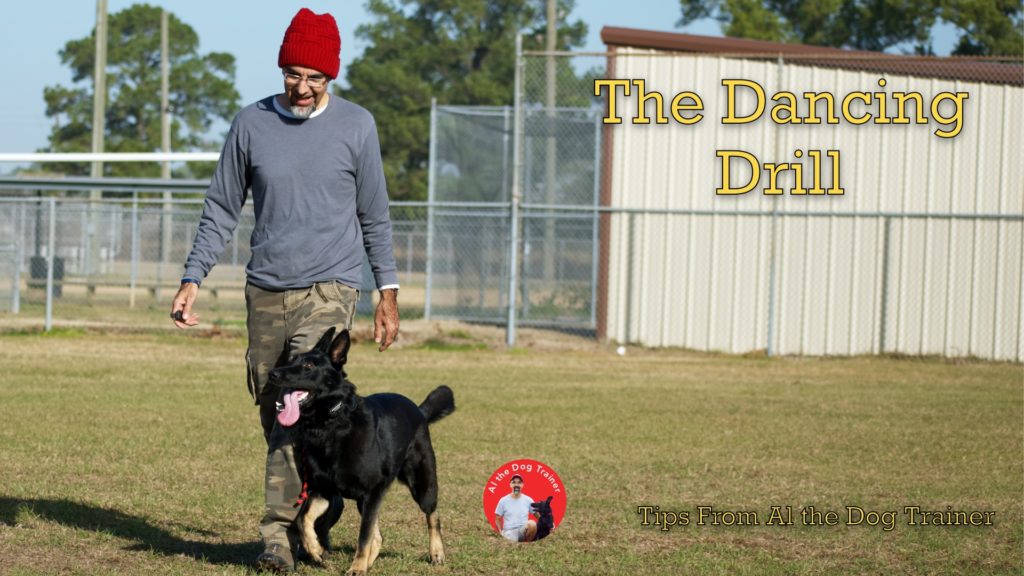
I call this the dancing drill because you will set some arbitrary limits on how far you are going to walk. The best places that I have found to practice this are the driveway to your home or on the street directly in front of your home. If you don’t have either, a local park’s parking lot will work really well too. Once you’re at your training location, pick out two easily identifiable points that are about 40 paces apart. Each time you get to either one, you will turn around and lead your dog in the other direction.
One-Handed Leash Grip
Now I want to walk you through how you will handle the leash, your footwork, and voice commands. First, I’m going to teach the One-Handed Leash Grip. This is how you should handle the leash. I want you to pass your left hand through the loop on the end of your leash. Next, spread your thumb and forefinger apart and come over the back of your hand with the leash. Now place the leash in the palm of your hand and close your grip.
You should also already have a knot in your leash closer to your dog that would be at your left-hand level when your arm is down by your side.
Ok, so now I’m going to go over moving together and turning right since they are handled in a very similar way.
Moving Together
Make the One-Handed Leash Grip, and then lock your left elbow out. Lead out with your left leg and then tell your dog, “Let’s go.” As you head out, remember rule #1. You should be headed to the end of the dance floor that you set earlier. As you approach that line or if your dog breaks Rule #2, turn around to the right away from your dog. Your elbow should not bend at all, and you should not slow down. Regardless of if you reached the end of the dance floor or if your dog broke Rule #2, it is now possible that your dog is in the target position, and you should now use Rule #1.
It would be best if you kept heading up and down the dance floor and using Rules #1 through #3. I’d like you to perform no less than 6 right-hand turns before you move to turn left and stop and sit together.
The technique for making left-hand turns is somewhat more difficult, so I’ve broken it down into 4 steps.
Left-Hand Turns – The Four Steps:
- Bend my elbow.
- Grab the knot.
- Lead with my left.
- Slack the knot.
As you are moving together with your dog and intend to turn left, you will want first to bend your left elbow, then bring your right hand across your body to grab your leash above the steering knot. With your right hand on the leash, take your left hand, grab the steering knot, and release the leash with your right hand. Next, you will apply gentle pressure to the steering knot and lead your dog to the left, with your left leg initiating the movement. Once you have completed the left-handed turn, you should release the steering knot and apply Rule #1.
Stop Your Dog – The Four Steps
- Bend my elbow.
- Grab the knot.
- Slow down.
- Stop and sit my dog.
As you decide to stop and sit your dog, you should first bend your left elbow, then bring your right hand across your body to grab your leash above the steering knot. With your right hand above the steering knot, take your left hand, grab the steering knot, and then release the leash with your right hand. Next, you will apply gentle pressure on your leash, followed by slowing down your pace. After several paces, come to a stop and slack your leash and observe Rule #1. You may also decide to sit your dog here too. Feel free to do that; make sure that you observe Rule #1.
Become Fluent
You’re going to have to become fluent in these techniques as quickly as you possibly can. Your dog will never exceed your ability to handle them well. So, when your handling becomes good, then so too will your dog.
For your first session, I want you to get no less than 15 right-hand turns, 15 left-hand turns, and at least stopping with your dog 3 times.
After this starter session, I will want you to practice for no less than 20 minutes each day for the next two weeks. When you have these sessions, break them up into 3 turns and a stop and sit. Get 5 of these, then give your dog the “free” command. When you free your dog, start back with another set of turns and stops after 2 minutes. You can do more, but please observe the rules, especially Rule #1. This rule is what will build your long-term success.
These steps are as detailed as I could imagine. With that said, If something is not going right for you, please reach out to me. You and your dog can succeed.
I hope this was helpful. Please remember that you can go to my YouTube Channel for more tips like this or right here on www.longoriahausdogtraining.com.
Happy Training!